I haven’t written anything for a while. First, I had some lazy times over easter 🐰, and then I focused on getting a personal website deployed(if you are reading this post, I succeeded 🎉). I’ve played with GatsbyJS a couple of times and decided to use it for my website to host my weekly notes and other writings. I wanted to use Markdown because I love its simplicity, and most of the time, I’m taking notes in this format. Getting GatsbyJS to render Markdown using GraphQL wasn’t too tricky. Thanks to these excellent guides. However, styling the components felt like an effort, so I’ve decided to add the blog page using the Simple Blog Theme. Why would I reinvent the wheel?
Deploying this blog was the second time I deployed a GatsbyJS app to GitHub pages, but I still had to do some Googling mainly because I wanted to use GitHub Actions to do the work for me. How? Every time I push to the master branch, a workflow is triggered to build the Gatsby app and push it to a dedicated release branch. GitHub Pages serves the app from this release branch.
If you are still reading, I assume you have a Gatsby project that you’d like to deploy to GitHub Pages. If you don’t, but you’d like to follow along, don’t worry. You can get a Hello Word starter up in no times(a prerequisite installing the Gatsby CLI):
gatsby new <your-project-name> https://github.com/gatsbyjs/gatsby-starter-hello-worldAdd the gh-pages node module to the project that will allow publishing the site to a branch on GitHub
yarn add gh-pagesAdd a deploy script to your package.json file.
{
...
  "scripts": {
    "deploy": "gatsby build && gh-pages -d public -b <your-release-branch-name>",
  },
...
}
The above script will build the app and push the content from the public folder onto the release branch. Make sure to create the release branch before running the deploy script.
git branch <your-release-branch-name>and now 🚀
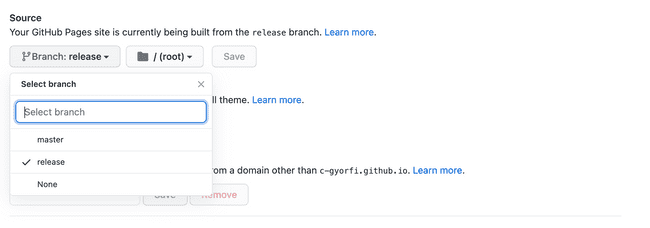
yarn deploySelect the desired relese branch:
GitHub repository > Settings > Pages
It’s time to ask GitHub Actions to do this hard work for us. Add the following workflow file in .github/workflows/<name-you-prefer>.yml:
name: Deploy

jobs:
  build:
    runs-on: ubuntu-latest
    steps:
    - uses: actions/checkout@v2
    - name: Set up Node
      uses: actions/setup-node@v1
      with:
        node-version: 15.x
    - name: Install Gatsby CLI
      run: npm install -g gatsby-cli
    - name: Install dependencies
      run: yarn
    - name: Deploy
      run: |
        git config --global user.name "Github Actions"
        yarn deploy
      env:
        GITHUB_ACTOR: ${{ secrets.GITHUB_ACTOR }}
        GITHUB_TOKEN: ${{ secrets.GITHUB_TOKEN }}
on:
  push:
    branches: [ master ]
There are a couple of things to address regarding the above config:
- A git user name needs to be configured to be able to commit from the workflow environment
- Oddly, GitHub Actions doesn’t have the permission to push to branch by default, therefore the GITHUB_ACTOR and GITHUB_TOKEN environment varibles needs to be exported. They are automatically available in the workflow environment.
The deploy script in the package.json file needs a final touch. Using the -r flag, we can pass the repo URL along with the token that will grant permission to GitHub Actions to publish the changes to our repo.
{
...
  "scripts": {
    "deploy": "gatsby build && gh-pages -d public -b <your-release-branch-name> -r https://$GITHUB_ACTOR:$GITHUB_TOKEN@github.com/<username>/<repo>",
  },
...
}
Now we are all set! 🎉 Every time we push to master, GitHub Actions will build and deploy the Gatsby application. 🤖
